How to Build a Side Table
>

Looking to build a new side table for your living room or bedroom? Build this sturdy Arts and Crafts–style side table from stock lumber—you can even customize its height to fit alongside your existing seating or square up the angles for a more modern look.
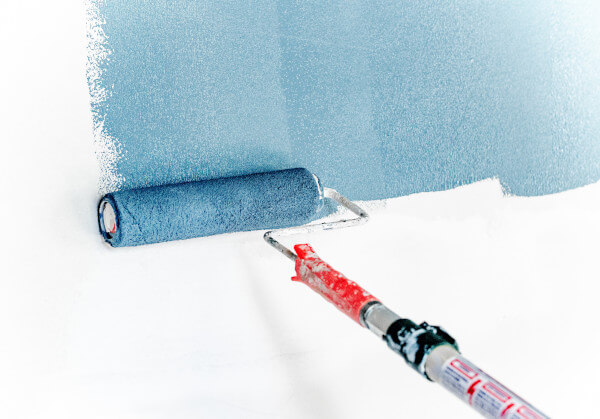
Butch and Sundance. Bonnie and Clyde. Starsky and Hutch. Like any memorable duo, an armchair is lost without a tag-along table as a sidekick. Fulfilling both form and function, a side table makes for a nice pairing and serves as a great place to set your drink. And a table like the one at right, which cloaks Arts and Crafts bones in an unexpected color, bucks tradition in favor of a fresh look that fits right in with any setting.
A slew of retailers offer premade options along these lines, but the tables are also available in myriad styles and finishes. Or if you’d rather do it yourself, no problem: For under $100, you can easily cut and assemble one of your own, as you can see on the following page. Whichever choice you make, you’re sure to appreciate not having to hold your drink in your lap.
Shown: Whitewood Bomby Tall Unfinished End Table by International Concepts, $103; Amazon
Paint: Benjamin Moore’s Avon Green (HC-126), $10 per quart
How to Build a Side Table
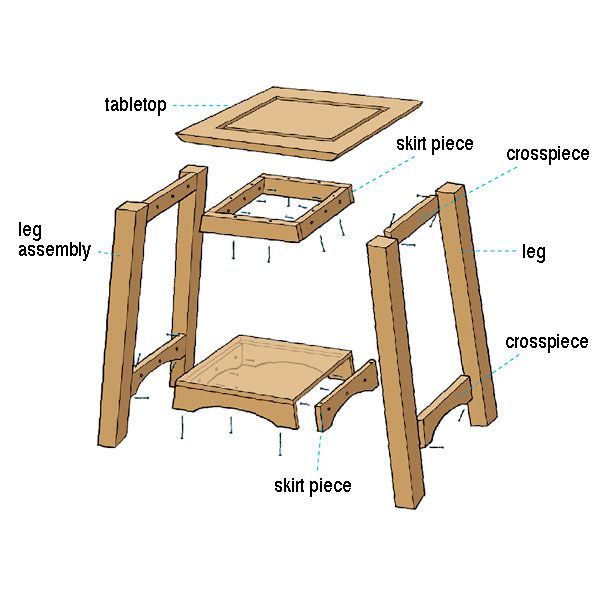
Illustration by Gregory Nemec
Cut List
¾-inch plywood top: 18 by 18 inches¾-inch plywood shelf: 15½ by 14 inches1x2 upper crosspieces: 2 at 12¼ inches (from short point to short point)1×3 lower crosspieces: 2 at 15 inches (from short point to short point)2×2 legs: 4 at 24¼ inches1x2 tabletop skirt pieces: 4 at 12¼ (from short point to short point)1×3 shelf skirt pieces: 4 at 14¼ inches (from short point to short point)Download a printable side-table cut list and plan here
Step 1: Cut the Pieces
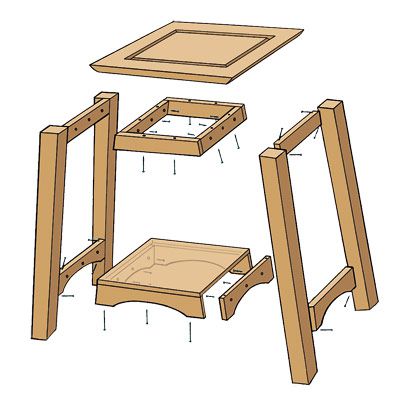
Illustration by Gregory NemecTo splay the legs, chop their ends at parallel 5-degree angles according to the cut list. Trim the ends of all the horizontal pieces at opposing angles to fit between the legs, and bevel their top edges so that they end up flat. Using a jigsaw, cut a curve on the six lower horizontal pieces. Cut the tabletop to size and bevel its edges.
Step 2: Make Two Leg Assemblies
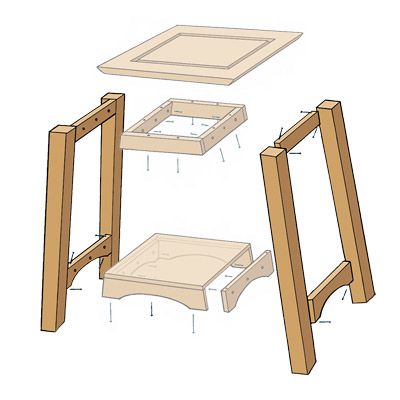
Illustration by Gregory NemecClamp two crosspieces between two legs—the straight one even at the top, the curved one at shelf height—with the flats flush to the inside. Drill countersink holes at an angle through the crosspieces and into the legs, and screw them in place. Build a second.
Step 3: Put the Pieces Together
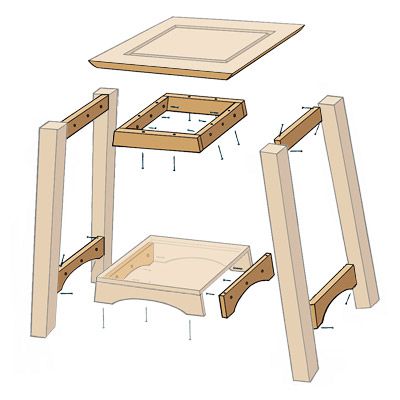
Illustration by Gregory NemecGlue and screw the skirt pieces to the underside of the tabletop and shelf, then clamp that frame between the leg assemblies. Drill pilot holes out through the skirt and halfway into the crosspieces, making sure not to punch all the way through. Secure the top and shelf with deck screws.
Step 4: Finish the Table
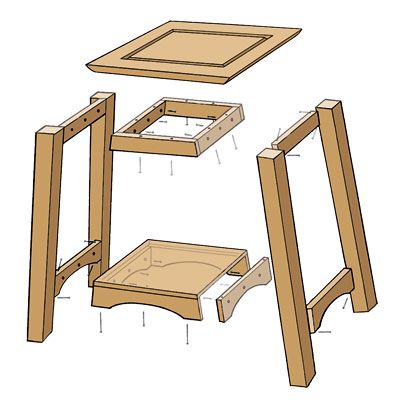
Illustration by Gregory NemecFill each hole with a plug. Using a pull saw, cut each plug flush with the surrounding surface. Sand and paint the table.