How to Frame a Corner
>

iStock
When framing wall corners, try this alternative approach that uses less material and is more energy-efficient.
If wall framing is on your to-do list, in addition to planning your layout and gathering materials, it’s a good idea to spend a little time considering the corners.
Whether interior or exterior, corners are a multitasking part of the wall. They form the connection between two right- (and sometimes oblique-) angled walls; they help support the structure above and provide sheer strength for exterior walls. They also offer nailing surfaces or backing, for drywall, exterior sheathing, and trim boards.
Corner Framing Methods
Traditional framing (3- or 4-stud corner)
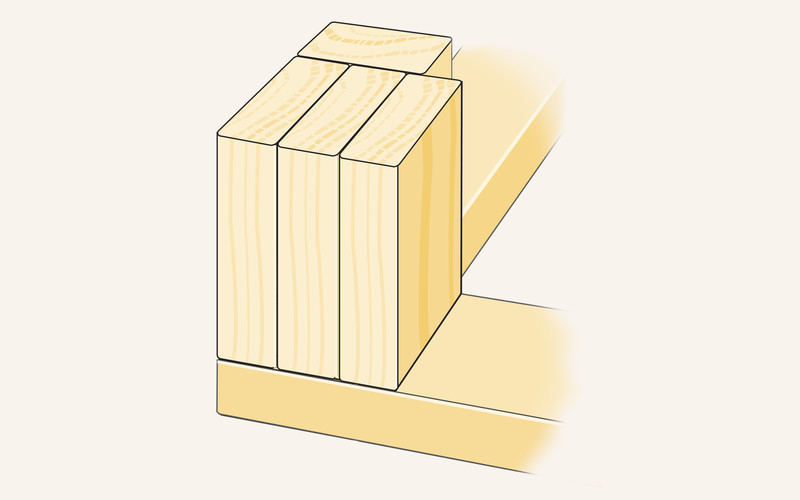
Ian WorpoleFig. 1In traditional framing, the corner was made from three or four studs and blocking made from scrap 2x lumber. (Fig.1)
As energy and material costs increased, it became apparent that this method used more lumber than necessary. More importantly, it produced a cold spot in the wall during winter because the solid mass couldn’t be insulated.
Known as “thermal bridging,” heat loss occurs when cold air is conducted through a solid material from the outside to the interior. In this case, from the sheathing, through the framing, to the interior drywall.
California corner
Exterior walls
These days, a more common method of exterior corner construction uses two studs joined at right angles at the ends of the two plates, and a third nailed inside the two for backing. (Fig. 2) Often referred to as a “California corner,” this alternative method leaves room for insulation, so it’s more energy efficient.
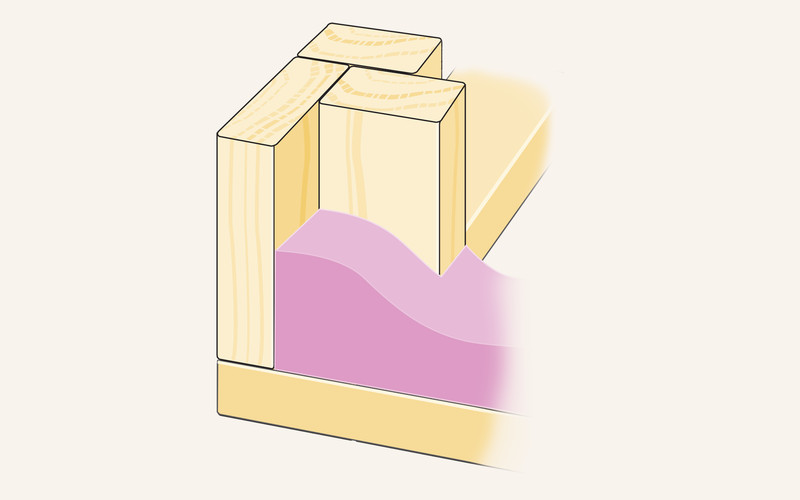
Ian WorpoleFig. 2If additional backing is needed for corner boards, siding, or trim, a third stud can be added, leaving room for insulation. (Fig. 3)
(For those who live in a seismic zone, check with your local building officials before you start. Seismic codes often require more mass in corners.)
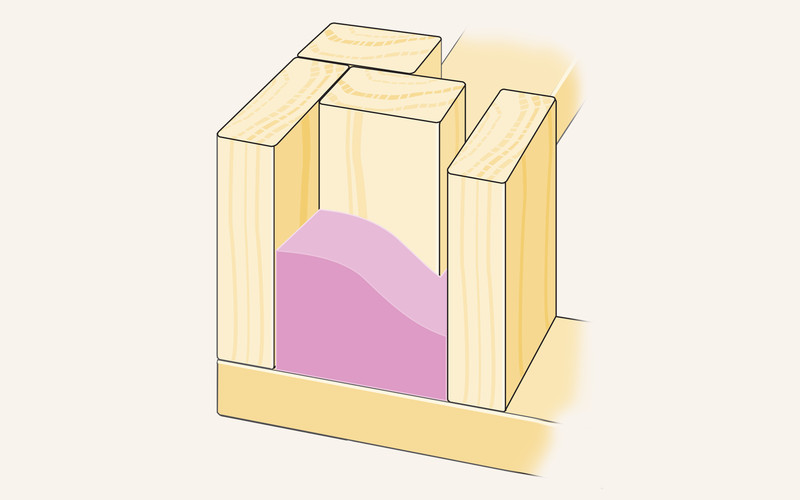
Ian WorpoleFig. 3Interior walls
The same two-stud configuration can be used on interior walls, but instead of a third stud for backing, some builders will use drywall clips—small right-angled tabs made from metal or plastic nailed onto the inside corner to take the place of a wood backer. As an alternative to clips, you can also attach backing made from 1x or 2x scrap material.
What you need to frame a corner stud wall:
Pair of sawhorsesCircular or miter sawTape measure
Hammer Driver/drill16d common nails
8d common nails or 3-in. construction screws—not drywall screws
2x4s or 2x6s>
Drywall clips or scrap lumber
Steps for Framing a Corner
Let’s assume that the walls are framed, in place, and only lack a corner.
Place your lumber across the two sawhorses.Measure the distance from the bottom plate to the top plate, transfer the measurement to the framing lumber, and cut the lumber to length with a circular or miter saw. (Tip: To get a nice square cut with a circular saw, place a speed square against the stud alongside the saw base and use it to guide the saw.)Install the first stud at the end of a wall plate by toenailing it (driving the nails at an angle) with two 8d nails on each wider side, top, and bottom. Make sure the stud is flush to the sides of the plates.Install the second stud on the end of the intersecting wall using the same method, and then nail the two together with 16d nails every 16 inches or so, making sure that their meeting edges align.Now add the third stud, nailing it on the inside intersection of the first two to complete the interior corner backing. In an exterior corner, either fill the space on the outside of the corner with spray foam insulation or cut rigid insulation to fill the cavity.This arrangement works for an interior corner as well. Still, suppose you want to use less lumber. In that case, you can replace the third stud by nailing shorter 2x blocks or 1x material in the same location, or, as a third alternative, you can form the interior corner by nailing or screwing drywall clips every 12 inches or so to the inside edge of the inside stud.
Did you miss our previous article…
https://www.tampa-bay-homes-guide.com/?p=1581