How to Install a Cork Floor

>

An eco-friendly floor that’s also easy on the feet
It’s bad enough to have to get up in the morning, let alone get up and experience the icy shock of a cold floor. What you need is some warmth underfoot, a little cushion as you pad across the house. Enter cork. Resilient yet durable, stylish yet earthy, a natural cork floor can turn any cool room into a cozy haven. Cork is also a lot easier to install than traditional wood flooring. Manufacturers now offer products in engineered panels that snap together without glue or nails. These floating-floor systems sit well over plywood, concrete, or even existing flooring. As This Old House technical editor Mark Powers shows here, in one afternoon you can turn a kitchen or playroom floor into a comfortable mat where your toes can roam free without fear of the big chill.
Cork Floor Overview
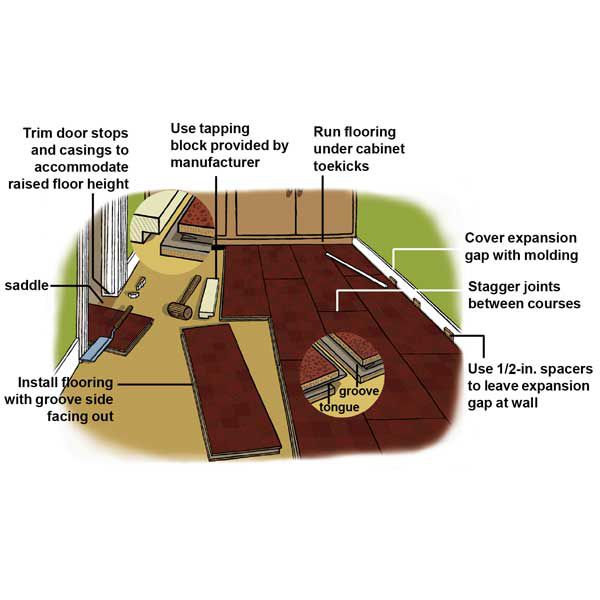
Illustration by Gregory NemecInstalling a click-together floating floor is a simple process, but a few guidelines need minding. To begin, while cork flooring is appropriate for most spaces in your house, its unglued seams will absorb water, which can swell and potentially warp individual planks. That rules out its use in wet rooms such as baths.
And, like all natural materials, cork expands and contracts with changes in weather. Each piece may only move a little, but that adds up over the width of an entire room. This cumulative effect requires you to leave a 1/2-inch space around the perimeter of the flooring. Of course, for a finished appearance you’ll want to hide that expansion gap. If your walls have baseboard, you can carefully pry it off before you start, then run the flooring to within 1/2 inch of the wall and reinstall the base atop the new floor. An easier option: Leave the baseboard in place, lay the floor with that half-inch gap, and then cover it with shoe molding. If your baseboard already has shoe molding, you’ll have to remove and reinstall it.
Manufacturers provide a special tapping block that, when butted to a plank and knocked with a hammer, helps lock the tongue of one piece into the groove of another. Make sure you use this block rather than a wood scrap or a direct hammer blow, both of which may damage a plank’s soft pressboard backing and make a tight join impossible.
Finally, while nearly all cork flooring comes prefinished and goes down in an afternoon, a few companies suggest applying an extra protective finish coat of polyurethane after the installation. And most manufacturers recommend that you unpack all the material 72 hours before starting a job to allow it to acclimate to its surroundings. So keep your timing in mind—you may need to wait to install the flooring and then take the room out of commission for a day or two.
Step 1: Prep Steps

Kolin SmithLook for any vertical trim that will need to be cut away to allow the new flooring to slide beneath it. At doorways, place a cork plank atop the saddle (the threshold) and butted to the door stops. Using a flush-cutting backsaw, trim the stops—but not the jambs—]on either side of the door above the saddle. Carefully pry up the saddle before installing the flooring. Also cut the casings on the wall around the door, using a cork plank to judge how much to trim them.
In a kitchen installation, remove the cabinet toekicks if possible so you can run the cork under the cabinets. If the kick is stationary, plan to install the flooring up to within ½ inch of the toekick. This gap can be hidden in the finish step.
Installation over concrete, such as in a basement, requires the removal of any baseboard so you can cover the slab with 6-mil polyethylene sheeting and run it 3 inches up the wall. Overlap the sheeting’s seams by 8 inches and seal them with tape.
Step 2: Trim the Doorway Moldings

Kolin SmithAfter carefully sawing through each doorstop, pull away the cork-floor plank and remove the waste piece of wood. Then, pry up the saddle before installing the cork flooring. Also, use the backsaw to trim the casings on the wall around the door. Again, use a cork plank as a guide to judge how much of the casings you need to trim away.
Step 3: Trim the Planks for the First Course
Kolin SmithStart laying the planks along the longest uninterrupted wall. Measure the distance between it and the opposite wall, then subtract 1 inch for expansion. Divide the remainder by the width of a cork plank to calculate the number of courses needed to cover the floor.
If the last course ends up being less than half a plank, you’ll need to cut the first and last courses narrower to balance the layout. Add the width of the last course to the full width of a plank. Divide by two to find the width of the first and last course. Use a jigsaw to rip the first-course planks to this width. If you don’t need to rip down the first course, saw off their tongues to create an unobstructed expansion gap at the wall.
Step 4: Install the First Course
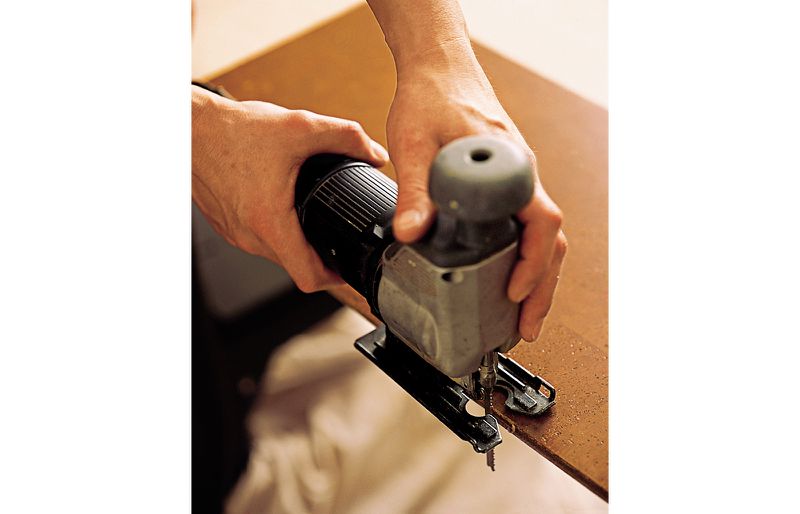
Kolin SmithTo piece the first course together, lift one plank off the floor at an angle, slide its end into the end of another plank and gently press down until the tongue and the groove click together. Continue joining planks end to end until the first course is complete. If you need to cut the last piece to length, use a jigsaw guided by a clamped straightedge.
Step 5: Install the First Course
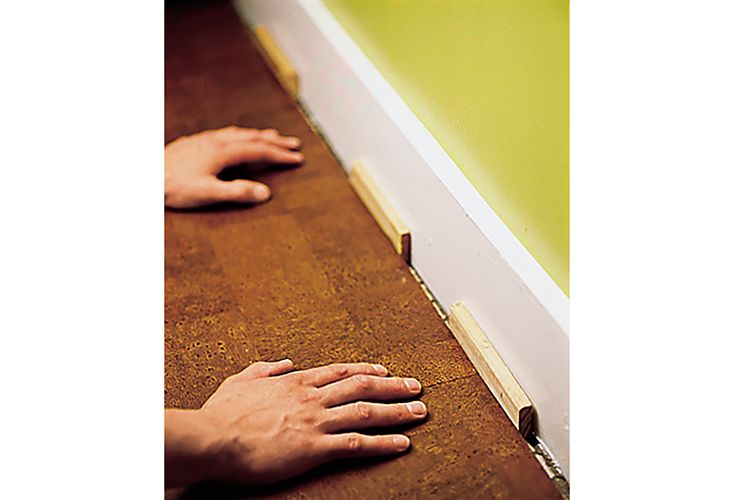
Kolin SmithPlace ½-inch spacers against the starting wall and slide the entire first course, groove side facing toward you, tight against the spacers.
Tip: Since each plank is unique in color and pattern, sort through and consider how you match and group your flooring.
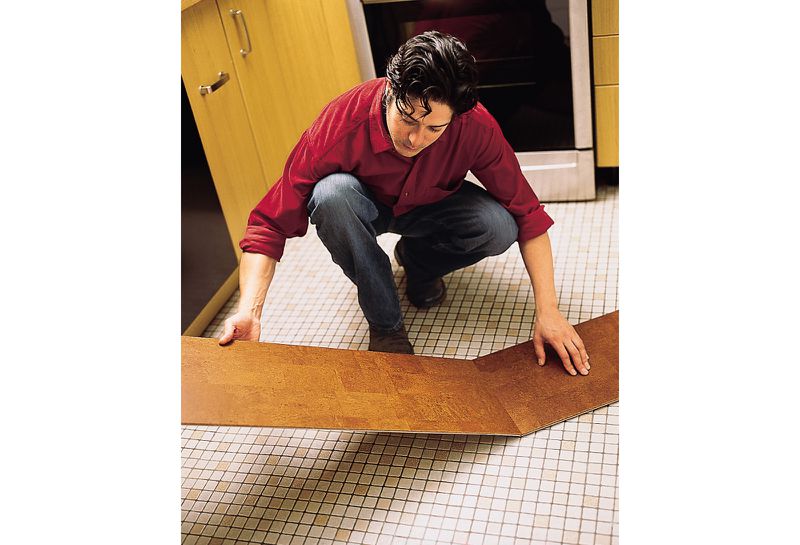
Step 6: Install the Rest of the Field

Kolin SmithIf you cut the last plank in the first course, and the leftover piece is longer than 10 inches, use it as the first piece in the second course. Set the cut end of the plank against a spacer at the end wall, then push the tongue of the plank against the first course.
Place a tapping block against the plank, fitting it around the groove. Use a hammer or mallet to tap block and coax the tongue and groove to click together. Install the next plank by clicking its end into the previous plank, then tapping it against the previous course. Continue installing planks until you have filled the field.
Tip: To keep the floating floor from moving as you tap in the following courses, weight it down with the stacks of uninstalled planks.
Step 7: Install the Last Course
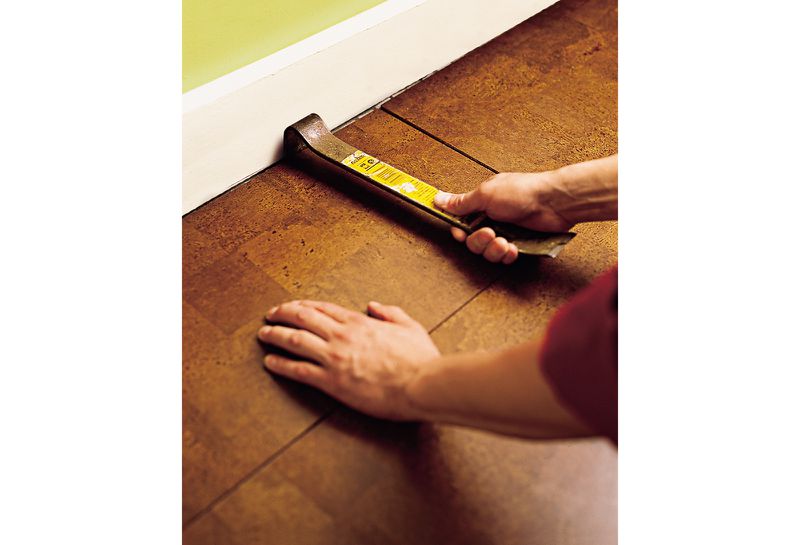
Kolin SmithIf necessary to fit the final course, rip down the planks to width, taking away from the groove side. Remember to account for the ½-inch expansion gap.
Angle each piece into place and let it drop flat to the floor. To click and lock it to the previous row, hook it with a pry bar and pull the bar toward you.
Tip: Rent a table saw for cleaner, quicker cuts, especially if you’re flooring over a large area or more than one room.
Step 8: Trim out the Floor
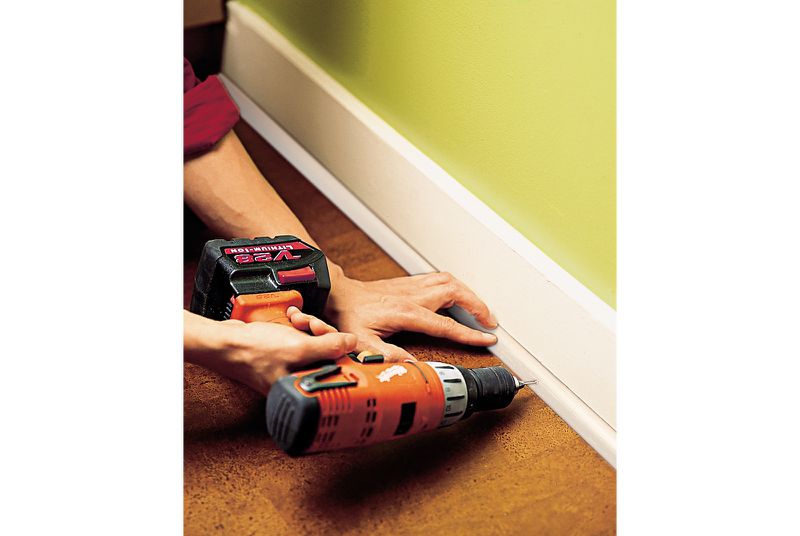
Kolin SmithMeasure the walls that require shoe molding and cut the molding to length using a backsaw and miter box. For corners, join the molding at a 45-degree angle.
Never nail the molding to the flooring, which would prevent the cork from floating with changes in the weather. To ensure that your nails aim true into the baseboard and to prevent the molding from splitting, drill 1/16-inch pilot holes every 12 inches through the shoe molding. Fasten the molding to the baseboard with 4d finish nails.
Reinstall any doorway saddle. If the saddle doesn’t sit flush on the floor in the next room, fill the gap with a narrow length of flat stock or quarter-round molding.
If you removed the cabinet toekicks before installation, trim their height by the thickness of the new floor and reinstall them.
Tools
Did you miss our previous article…
https://www.tampa-bay-homes-guide.com/?p=541