The Pros and Cons of Hardwood Floor Refinishing
Hardwood Floor Refinishing NJ can dramatically change the look of your room. It is a time-consuming process that requires a lot of hard work, but it can make your hardwood floors look new again.
First, you must remove any molding that runs along the base of your walls. This will help prevent dust from getting in your home while refinishing the hardwood.
Hardwood floors are a beautiful addition to any home and can be a major selling point. However, they require regular care and refinishing to stay in good condition. It is important to refinish your hardwood floors every couple years to keep them looking great and to prolong their lifespan. This will also prevent damage to the wood, which can lead to costly repairs or replacements in the future. Properly preparing the subfloor and hardwood for installation will ensure that the job is done correctly and that your floors perform well over time.
The first step in refinishing hardwood floors is to prepare the room for sanding. This includes removing all furniture and closing the doors and windows. It is also important to vacuum the floor before sanding to remove any dirt and debris.
It is also important to know what type of wood you have in your home so that you can select the right refinishing method. This can be done by examining the grain pattern of the boards. For example, if the boards have a swirly pattern, they are likely mahogany, while if the board has an S-shaped grain, it is probably maple. If the boards are solid wood with no finish, you can use a stain or filler stick to help fill small gaps during the refinishing process.
If the floor has an existing finish, it will need to be removed before refinishing. This can be done using a chemical stripper. If you decide to do this yourself, it is important to read the manufacturer’s instructions carefully and take all necessary safety precautions.
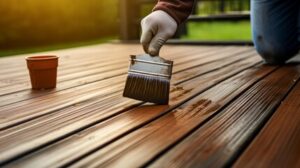
Once the floor is sanded, it is ready to be stained. It is best to choose an oil-based stain for durability. This can be brushed or mopped on, depending on the preference of the homeowner. It is also recommended that the stain be allowed to dry for at least 24 hours before applying a polyurethane sealant.
Refinishing hardwood floors is a time-consuming project that can take several days. However, the results are well worth the effort. A properly refinished hardwood floor will add value to your home and last for many years.
Sanding
Hardwood floors are a wonderful addition to any home. They look fantastic and can last for decades if they are properly maintained. However, over time, they can begin to show signs of wear and tear. If you notice that your floors have become dull or scratched, it might be time to refinish them. This process will remove the existing finish and apply a new one, making them look like new again.
Before you can refinish your hardwood floors, you will need to sand them down. This will remove the existing finish and any dirt or debris that may have built up over time. This will also make the wood smooth and prepare it for the staining process. You will need to sand the edges of the boards as well, as this will help to prevent splintering.
When sanding your hardwood floors, it is important to use a high-quality sanding machine. This will help to ensure that the sanding is done evenly and that all scratches are removed. You will also want to use a medium grit sandpaper when sanding, as this will provide the best results.
While you are sanding your hardwood floors, it’s important to remember to clean up your work area as often as possible. This will help to prevent the buildup of sawdust, which can hide defects and create a slipping hazard. You should also take the time to sweep up any sawdust that is left over after each sanding step.
After you have sanded your hardwood floors, you will need to apply a sealant to them. This will protect them from moisture and other damage, and it will also help to preserve them for longer. You will need to choose a type of sealant that is appropriate for your floor. Different types of wood react differently to certain sealants, so it is important to do your research before selecting one.
You will also need to decide how many coats of sealant you want to apply. Most experts recommend that you apply at least three coats, as this will give the hardwood a more durable finish.
Staining
Staining is a critical step in the floor refinishing process, but not everyone understands the pros and cons of this vital stage. Stain is different from varnish because it actually changes the color of your wood floors rather than simply adding a protective layer. For this reason, staining can be a good option for homeowners that have specific color preferences or want to accentuate the beauty of their natural wood grain.
Before beginning the staining process, it’s important to test the product in an inconspicuous area of your floor. This will help you decide if you’ll need to add more or less of the product, and what shade you may need to achieve.
After testing, work in manageable sections to apply the stain. Work along the grain of the wood, and let the stain sit for a few minutes before wiping away the excess with a clean rag. The longer the stain sits, the darker it will become, so be sure to check your progress often.
There are two main types of stains available for hardwood floors – dyes and pigments. Dye stains are translucent and only change the color of the wood, while pigmented stains actually alter the grain by obscuring it. Pigments are generally used for dark stains, and will require more coats than water-based dyes.
Once the stain is dry, it’s time for the finishing stage. This is where your hard work really pays off, because the final look of your floor will depend on how well you’ve done your job. It’s a good idea to finish with polyurethane, which will protect your floor and give it a nice sheen.
Depending on the type of polyurethane you’re using, you might need to sand between applications. If this is the case, sand with a fine 320-grit abrasive before applying the new coat of poly. This will help to ensure that the second coat adheres properly. Then you’re ready to enjoy your beautiful, newly refinished hardwood floors!
Finishing
Whether you choose to do the work yourself or hire a professional, refinishing is a labor-intensive process that requires attention to detail. If you’re not sure that you have the skills or the time to do it yourself, hiring a professional is a smart choice. Generally, refinishing is more expensive than installing new hardwood floors. However, it can save you money in the long run as your floors will last longer.
First, clear the room by moving all furniture and other items. Vacuum the floor and wipe it down with a damp cloth or rag. This will remove all dust, dirt and other debris. Next, sand the wood floor using a drum or orbital sander to remove the old finish and sanding marks. Begin with coarse grit and move to finer grits as you progress. This can be messy and time-consuming, but it’s essential for a smooth, new surface.
Staining is a popular option that can be done during refinishing to alter the color of the wood or even match the room’s décor. A good quality wood stain will penetrate and soak into the grain of the wood, creating a rich, vibrant finish. Once the stain is applied, allow it to dry completely before applying the final coat of polyurethane.
When applying the poly, be sure to use a high-quality product that is low or no VOC. This will help reduce the amount of indoor air pollutants that can harm your family’s health. You’ll also want to be sure to follow the manufacturer’s instructions for proper application. Lastly, it’s important to remember that while refinishing is an easy and relatively inexpensive way to revitalize your hardwood flooring, it can take a few days for the finished product to dry. During this time, it’s a good idea to keep windows and doors open as much as possible to allow fresh air to circulate throughout the house.
It’s important to refinish your hardwood floors every couple of years to prevent them from becoming dull and scratched. It’s a project that’s well worth the effort, especially in homes with children or pets.